
Sidechaining is a prevalent technique responsible for the ducking basslines and sounds you hear in your favorite house, techno, and – tracks in pretty much every genre out there. But how do you sidechain in Ableton, and what exactly is sidechaining?
You have most likely encountered sidechaining while listening to your favorite music. While it's mostly used to make your kick pop in your track, it's often used on other instruments and effects as well, for both rhythmic and creative purposes.
What Is Sidechaining?
Sidechaining is a compression technique to make your sound “duck” the output signal of another channel. In other words: apply sidechain to your sound, choose another it should react to, and the volume lowers when your desired sound plays.
Most commonly used for the kick and bass, the sidechaining technique is used to lower the volume of the bass every time a kick drum hits. As the kick and bassline dominate the lower frequency spectrum, sidechaining gives your kick room to breathe by temporarily lowering your bass’s volume. Because the lower frequencies are having a constant battle for space in the mix, not using sidechain can cause rough phasing issues and muddiness. And most importantly – without sidechaining, your kick can lose a lot of its impact.
Furthermore, sidechaining can also be used as an effect or to create or enhance the rhythm. You can also use it with effects like reverb or delay.
Why You Should Sidechain
Sidechaining is an essential music production technique that every producer needs in their toolbox. While many mainly use the effect to enhance their kick and bass relationship, there are many other areas where you can apply sidechaining.
Sidechaining For Mixing
The most obvious reason is, of course, for straight-up mixing purposes, as previously mentioned. Producers often use sidechaining to make their kick pop through in their mix, rather than get buried from their deep basslines. There are also other times when you want a particular sound or effect to get heard in a mix. In that case, a quick and easy way to achieve this is by using a sidechain.
Sidechaining For Rhythm
Another great use of sidechaining is for creating fascinating rhythms and grooves. Because sidechaining is dependent on the output signal from another track, you can use this to your advantage. Using a short drum sample, like a cowbell (everything needs more cowbell), you can make your original sound duck according to your cowbell rhythm.
And the best part is that because sidechaining depends on the signal and not perceived volume, you can silence the cowbell track and only use sidechaining for the rhythms themselves. The result is that your sound will duck in volume without any of your listeners knowing why. This can create exciting grooves that might have been difficult to achieve in other ways.
Sidechaining As A Cool Effect
The third use of sidechaining is to create cool ducking effects. Since you have no limitations to which sounds you can route your sidechain to, you can experiment and link different sounds together to make your sound swoosh as you wish.
For example, you might want your vocal reverb to be quieter when your vocalist sings. And when the singer stops, you want the reverb to pop back and ring into infinity. This effect can easily be achieved by routing the sidechain reverb to your vocal track. You can then add another sidechain on top, making your reverb duck further at the hit of your powerful plucks.
This technique can create fascinating textures and effects which really can take your track to the next level. Adjust to taste.
It’s also an excellent technique for building atmospheres around your drums that really sit in the background. Sidechain your forest or water sounds to your kick, snare, and hi-hats, and you will have your atmosphere playing in between all these sounds.
How To Sidechain In Ableton
Sidechaining in Ableton Live 10 is done very quickly through Live’s built-in compressor. In your compressor's sidechain settings, you have complete control over threshold, ratio, attack, release, and more, which all works to shape your particular sound.
Follow these six steps on how to sidechain in Ableton:
1. Add The Compressor.
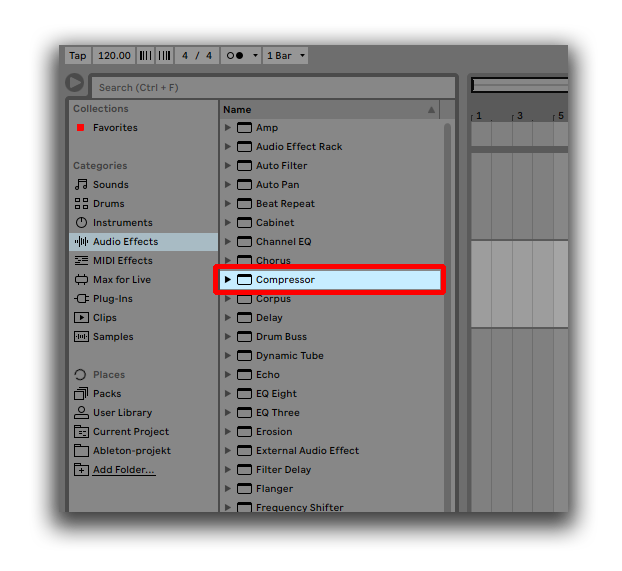
Go to "Audio Effects" in the left window and insert a Compressor by either double-clicking or dragging it down to your bottom Audio Effects slot. The compressor should be inserted in the sound you want to affect. For example, with kick and bass, you want to insert the compressor into the bass channel to route it to the kick.
2. The Compressor
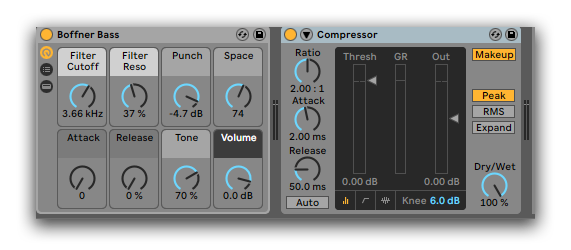
Now we have inserted the Compressor into the bass track (Live’s Operator “Boffner Bass” preset in this case.)
3. Reveal The Sidechaining
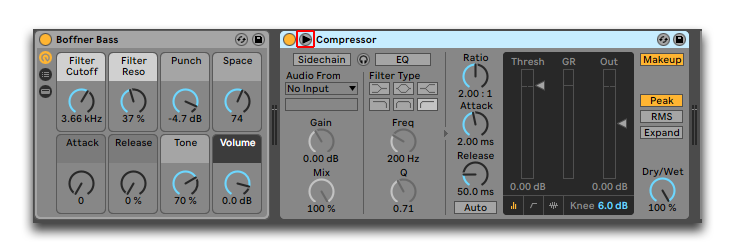
You now see the sidechain settings of the Compressor revealed. Click the ▼ symbol to the left of the text “Compressor” to reveal the sidechain panel.
4. Activate Sidechaining
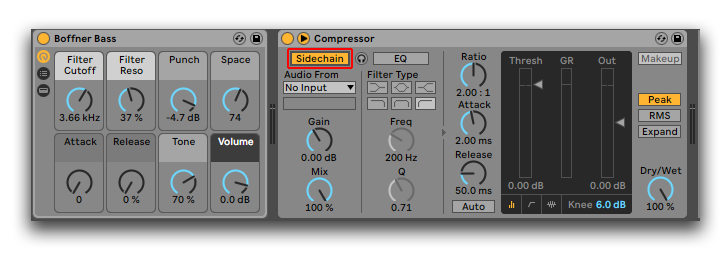
Click the grey “Sidechain” button to make it yellow. This button activates the sidechaining and lets you choose your "audio from" source.
5. Choose Your Channel
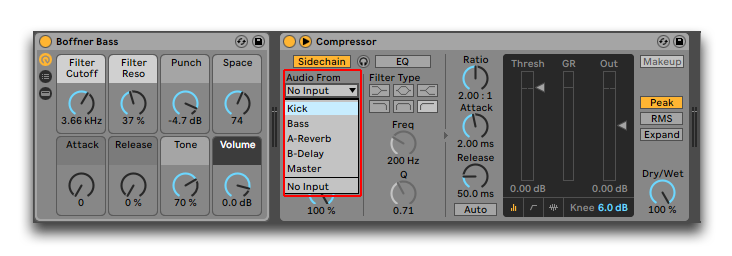
In "Audio From," select the channel with your desired output signal. In this kick and bass case, we choose the "Kick" track.
6. Voilà!
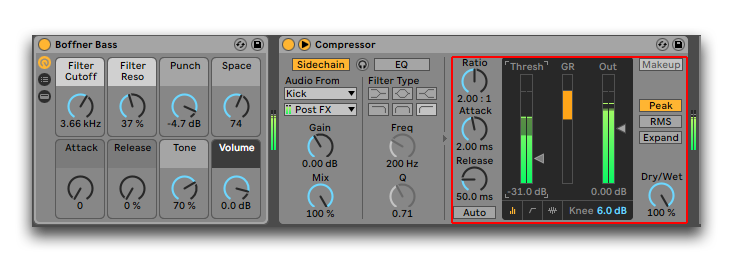
Play your kick and bass, and you will start to see things happen on the threshold, gain reduction, and output meters.
The Controls
There are a few controls you need to think about when sidechaining, using Ableton Live's built-in compressor.
The settings you mainly have to think about are:
- Ratio
- Attack
- Release
- Threshold
Simply put, the ratio is how much sidechaining effect you want to apply. Attack is how long it takes until the sidechaining affects your sound (in this case, the bass.) Release is how long it takes until the sidechaining stops.
You must also adjust the threshold with the slider. Go down, and you will start seeing the amount of gain reduction taking place. More gain reduction means more sidechain, or "ducking" effect.
Tip: You can also follow these steps in Ableton Live’s Glue Compressor, as seen here:

Sidechaining Tip From The Pros
Professional music producer’s sidechains very carefully. They want every millisecond to be perfect, as the difference between sloppiness and excellence can be night and day in the finished track.
But when sidechaining your bass with your kick sample, there’s a flaw: the waveform in the kick is not perfect.
In kick drum samples, there is an attack, sustain and release, which all impact the audio signal fueling the compressor and sidechain process. With the peaks and the troughs of the kick waveform, results can be not-so-accurate.
A Better Way To Sidechain Kick And Bass
The better way to create a kick and bass sidechain is by using a simple synth with one oscillator playing. A great way of doing this in Live is by using the Operator synth with a simple saw oscillator, copying the piano roll of your kick to the synth. Then, you mute the synth in Live, so you only get the signal feeding into the sidechain without the Operator sound.
Using the Operator instead of a kick sample, you get a cleaner signal and a much more precise sidechaining result. Furthermore, with the attack, decay, sustain, and release controls of the synth, you can control every aspect of the sound to make it spotless.
Sidechaining Examples
In the two examples below, listen what happens to the sounds when the kick hits. In the first example, a rhythmic sidechain can also be heard outside the kick.
Do you want to learn more music production techniques?
Then you can't miss our Mixing Course showing you exactly how to mix a track from start to finish. Inside are many more key techniques, including tips and tricks to make your tracks sound spotless.
Mixing A Track from Start To Finish

Click here to become a mixing master today.
Thanks for reading, and see you in the next article.
 Pelle Sundin is a Swedish music producer and writer, active with his chillout project PLMTRZ. He also produces psytrance. When he's not producing, he surfs, skates, and chugs coffee. |